Monday, 3 March 2014

Check Any record exists in given date Range while inserting a record

In Validate write of Table or Form Datasource

public boolean validateWrite()
{
    boolean                     ret;
    SCPProductPossessionCharges scpProductPossessionChargesloc;

    if (SCPProductPossessionCharges.FromDate > SCPProductPossessionCharges.ToDate)
    {
        error("@GLS90176");
        return false;
    }

  while select scpProductPossessionChargesloc
       where scpProductPossessionChargesloc.ItemId == SCPProductPossessionCharges.ItemId
          && scpProductPossessionChargesloc.SCPPossessionCharges == SCPProductPossessionCharges.SCPPossessionCharges
          && scpProductPossessionChargesloc.RecId != SCPProductPossessionCharges.RecId
    {
       ret = element.checkDateOverlap(SCPProductPossessionCharges,scpProductPossessionChargesloc);
        if(!ret)
        {
            error("@SCP353");//A record already exists for given date range
            return ret;
        }
    }

    ret = super();

    return ret;
}


one public method checkDateOverlap(newrecord,existingRecord)

public boolean checkDateOverlap(
    scpProductPossessionCharges _curVersion ,
    scpProductPossessionCharges _checkAgainstVersion )
{

        if ((_curVersion.ToDate   >= _checkAgainstVersion.FromDate || !_curVersion.ToDate) &&
            (_curVersion.FromDate <= _checkAgainstVersion.ToDate   || !_checkAgainstVersion.ToDate))
        {
            return false;
        }

        if (   _checkAgainstVersion.ToDate   >= _curVersion.FromDate
            && _checkAgainstVersion.FromDate <= _curVersion.ToDate)
        {
            return false;
        }


    return true;

}


Tuesday, 16 July 2013

Work flow in easy steps


http://learnax.blogspot.in/2012/01/dynamics-ax-2012-workflow-development.html
http://www.amer-ax.com/2010/07/create-workflow-in-three-easy-steps-by-workflow-for-dummies/

Tuesday, 6 November 2012

Only 2 clicks to get help on how to use functions with example [In Editor]

This post will be very helpful for the developers who are new and are looking for an example on how to use a functions with an example . Usually any developer who is very new to Dynamics AX will go to AOT >> System Documentation >> functions and will select a function >> right clicks and use edit option to get help on the function and example if any.
Well, I know its very boring way to go always to that level and get help. I have modified Editorscripts class again to get quick help in the editor itself.
All you need to do is add the below method “ShowExample” to the EditorScripts class

public void ShowExample(Editor editor)
{
str line;
int i;
int startLine = editor.selectionStartLine();
int endLine = editor.selectionEndLine();
int startCol = editor.selectionStartCol(); //points at the first selected char
int endCol = editor.selectionEndCol()-1; //points at the last selected char
MarkMode markMode = editor.markMode();
#define.maxLineLength(300)
#AOT
Form formBrowse;
FormHTMLControl htmlControl;
FormRun formRun;
Args args;
str htmlContent;
TreeNode functionTreeNode;
Editor _editor = editor;
str h1Tag;
void transform(str _function)
{
;
functionTreeNode = TreeNode::findNode(#SystemFunctionsPath+’\\’+_function);
if (!functionTreeNode)
throw error (“Function not found in System documentation”);
formBrowse = new Form(‘Function Example’, true);
formBrowse.design().caption(_function + ” Example”);
formBrowse.design().width(700);
formBrowse.design().height(500);
formBrowse.design().addControl(FormControlType::HTML, ‘html’);
args = new Args(formBrowse.name());
args.name(formBrowse.name());
args.object(formBrowse);
formRun = classFactory.formRunClass(args);
formRun.init();
htmlControl = formRun.design().controlName(‘html’);
htmlControl.height(1,1);
htmlControl.width(1,1);
formRun.run();
htmlControl.setText(functionTreeNode.AOTgetSource());
formRun.detach();
}
void transformLine(int lineNo, int start, int end)
{
_editor.gotoCol(0);
_editor.gotoLine(lineNo);
line = _editor.currentLine();
transform(substr(line, start, end-start+1)) ;
return;
}
;
editor.unmark();
switch (markMode)
{
case MarkMode::LineMark:
editor.gotoCol(1);
for (i=startLine; i<=endLine; i++)
{
transformLine(i, 1, #maxLineLength);
}
break;
case MarkMode::ColMark:
for (i=startLine; i<=endLine; i++)
{
transformLine(i, startCol, endCol);
}
break;
case MarkMode::AreaMark:
if (startLine == endLine)
{
transformLine(startLine, startCol, endCol);
}
else
{
//convert first line
transformLine(startLine, startCol, #maxLineLength);
//convert full lines
for (i=startLine+1; i<endLine; i++)
{
transformLine(i, 1, #maxLineLength);
}
//convert last line
transformLine(endLine, 1, endCol);
}
break;
}
}

Wondering how to use it now.
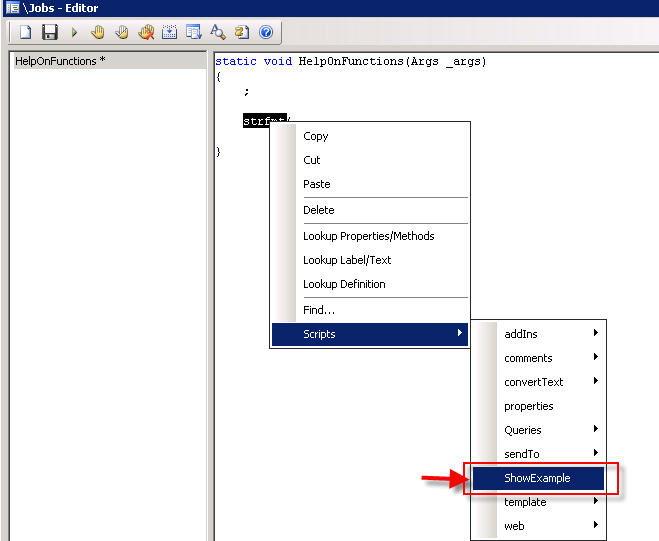
Create a new job and write any function. In the below example I have shown this by using strfmt function. Double click the function and select scripts button>> Show example as shown below

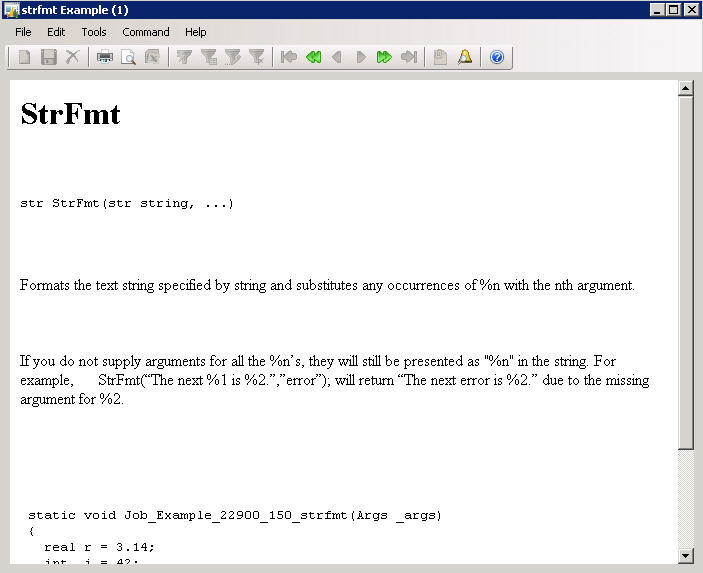
There you go. you will get help on how to use this function with an example on your screen. Isn’t it helpful?? Below is the output form which gives you quick help on the functions. You can get the help for any function which is defined in system documentation.

Friday, 2 November 2012

Use resource files in Axapta

Axapta provides a very handy feature to allow developers to ship their solution with Axapta built-in image files. In Application Object Tree, you can find resources node. Select resources node and right click; select Create from File, specify the file location for the new resource file. After that you can use this resource file in Axapta without specifying an absolute file path in your hard disk.
Then let’s see how to use this kind of files in Axapta.
First, pick up the resource node from AOT;
SysResource::getResourceNode();
Then generate a temporary file for this resource file;
SysResource::saveToTempFile()
Finally specify the temporary file path for controls.
Here comes an example to show how to use a resource file as a background image of  a given form.
    {        ResourceNode            resourceNode;
        FilePath  imagename;
        ;
        resourceNode = SysResource::getResourceNode(resourcestr(ResourceName)); 
        if (resourceNode)
        {
            resourceNode. AOTload();
            imagename =  SysResource::saveToTempFile(resourceNode);
        }
        else
        {
             throw Error("No file exists.")
        }
        element.design().imageName(imagename);
    }

Monday, 15 October 2012

Creating a new line in a grid using command button


under click method of command button use the following code;

void clicked()
{
   <tablename>_ds.create(true);
   super();
}

Thursday, 11 October 2012

blog for reread research refresh.

http://kashperuk.blogspot.in/2010/03/tutorial-reread-refresh-research.html

Sunday, 23 September 2012

Finding unused labels in Dynamics Ax 2009

static void FindUnUsedLabels()
{
    str 50          labelId;
    str             labelString;
    int             i;
    //set max label to the highest number of labelId in your application
    int             maxLabel = 2000;
    xRefNames       names;
    XRefReferences  ref;

    ;

    while (i <= maxLabel)  
    {
        //Sequential generation
        labelId = "@IFC" + int2str(i);
        
        //Find if the label id has an cross reference
        //record
        select recid from names
            where names.Name == labelid
        exists join ref
            where names.RecId == ref.xRefNameRecId;

        labelString = SysLabel::labelId2String(labelId);
        
        //If there is no record in cross reference then log it
        if (! names.RecId &&
        //avoid logging labels that are already deleted (This is because of sequential check like IFC1, IFC2, IFC3 etc...)
            labelString != labelId)
        {
            info(strfmt("%1 - %2\n", labelId, SysLabel::labelId2String(labelId)));
        }

        i++;
    }

}

Thursday, 20 September 2012

use display method as titlefield

1. in the caption() method of table write the below code
public str caption()
{
str ret;
ret = super();
ret = this.news() ; // news is a display method
return ret;
}
In the form design mention the datasource of table name
you can use it if  you need even a single field ,not more than 2 field.. you can display any number of fields
just  use and return the display method in the caption method of table


or

Code to disply the emp_id on the title bar of the form

Path : MyEmplForm-->Data Sources-->MyEmplTable-->Methods-->active()


public int active()
{
    int  ret;
    ret  = super();
    element.design().caption(EmpLeaveDetails.Emp_Id);
    return  ret;
}
 

Monday, 17 September 2012

Processing multiple records

In my practice, I was asked a number of times to create various application functions that
process user-selected records in a form grid. Regardless of what function is being created, the
first step was always to determine what records were selected by the user.
In this recipe, we explore several ways of achieving this goal. We will modify the Items form
in the Inventory management module by adding a new button to it, which lists currently
selected records in the overview grid.
How to do it…

1. In AOT, open the InventTable form and create a new method with the following code:
void processSelectedItems()
{
InventTable inventTableLocal;
;
for (inventTableLocal = InventTable_ds.getFirst(true) ?
InventTable_ds.getFirst(true) :
InventTable;
inventTableLocal;
inventTableLocal = InventTable_ds.getNext())
{
info(strfmt(
“You’ve selected item ‘%1′”,
inventTableLocal.ItemId));
}
}
2. Add a new Button to the form’s ButtonGroup group:
Property Value
Name ProcessSelectedItems
Text Process
MultiSelect Yes
3. Override its clicked() with the following code:
void clicked()
{;
super();
element.processSelectedItems();
}
4. To test the record selection, open Inventory management | Item Details, select
several records using SHIFT or CTRL and click the Process button. The selected
items should be displayed in the Infolog:
How it works…
The key element in this recipe is a for statement in processSelectedItems(). First, it
checks if more than one record is selected by calling getFirst(true) on the InventTable
form data source. If yes, the for loops all the selected records from the data source,
otherwise it uses the cursor, which corresponds to the currently selected single record. All
selected records are then stored in the local variable inventTableLocal. In this example,
we just output inventory item numbers into the Infolog using the global info() function.
The ProcessSelectedItems button is used to call the function above once the user clicks it.
Notice that its property MultiSelect is set to Yes to ensure it is still enabled when multiple
records are selected.
There’s more…
I have also experienced that sometimes Dynamics AX users struggle to select multiple records
using SHIFT or CTRL. Sometimes, it is not clear that the form itself supports multiple record
processing. In such cases a more convenient way of selecting multiple records could be to add
a new checkbox in front of each record. This would remove all confusion and improve user
experience. In order to implement that, we need to make few changes to the example above.
First, we add a new Map variable to the form’s class declaration:
Map marked;
And in the form’s init() right after the variable declaration section we create its instance:
marked = new Map(Types::Int64, Types::String);
Then, we create a new edit method on the InventTable data source with the following code:
edit boolean editMark(
boolean _set,
InventTable _inventTable,
boolean _mark)
{;
if (_set)
{
if (!_mark)
{
if (marked.exists(_inventTable.RecId))
{
marked.remove(_inventTable.RecId);
}
}
else
{
marked.insert(
_inventTable.RecId,
_inventTable.ItemId);
}
}
return marked.exists(_inventTable.RecId);
}
We also add a new CheckBox to the top of the form’s Grid in the Overview tab page with the
following properties:
Property Value
Name Mark
Label Select
DataSource InventTable
DataMethod editMark
Finally, we have to modify processSelectedItems() to loop though the map. Replace the
method with the following code:
void processSelectedItems()
{
MapEnumerator mapEnumerator;
;
mapEnumerator = marked.getEnumerator();
while (mapEnumerator.moveNext())
{
info(strfmt(
“You’ve selected item ‘%1′”,
marked.lookup(mapEnumerator.currentKey())));
}
}
Open the Items form again and notice that now it has a new checkbox Select in front of
each record. Pick several records using it and click Process. The selected items should be
displayed in the Infolog:
The principle of this technique is that we use a Map type object to store the list of selected
item numbers. The editMarked() method is bound to the checkbox control and is
responsible for adding a record to the map upon user selection and removing it from the map
if the user deselects the checkbox.
We also use the MapEnumerator class to retrieve item numbers from the map for
further processing.

Wednesday, 12 September 2012

adding table for search.

Adding table for search.

Its a new feature in ax 2012,which it makes our table to be searchable.means using this feature we have chance to search data in table .

this is possible using as following ,


steps involved:

1: go to aot -->tables--> properties-->modifieddatetime property to yes save it
2:create a query which is having name with good meaning make the datasource as your table and go to properties of datasouce change the name to table name that you want to search and change the dynamic property of fields to yes.and go to properties of query and make searcheble option to yes.
3.at last restart the service that is Dynamics ax  object server .

Wednesday, 5 September 2012

how to use menu item dynamically ?

how to use menu item directly ?

we will use menuitem directly using a class called menufuntion .

menufunction=new menufunction(menuitemoutputstr(reportname));//in case of report
                                                  menuitemdisplaystr //in case of form
                                                  menuitemactionstr //in case of class

Working with external database.

Working with external database :-


In this example i will explain how to access external sqlserver database tables in ax .

Steps:

Before going to work with database we have to first create a DNS through which we access external database .to create dns follow these steps,
 1)Administration Tools-->Database(odbc)
2)Dsn-->add (which opens a wizard)-->select sqlserver-->finish
3)(opens another window consists of) referdatasource name : give any name let us it is AX
     a)description:AX
    b)server:(its your server name) to which you want to connect
   c)next,next,finish-->testdatasource -->test connection
This finishes DNS creation

step2:

create a new job as follows:

static void odbcTest(Args _args)
{
  odbcconnection odbc;
LoginProperty login;
Statement st;
ResultSet rt;
;
login=new LoginProperty();
login.setDSN("AX");
login.setDatabase("AX593");
odbc=new odbcconnection(login);
st=odbc.createstatement();
rt=st.executequery("select * from custtable");
while(rt.next())
{
 info(rt.getstring(1));//here 1-represents coloumn number
info(rt.getstring(2))
}
}
}

Edit Method Example on table.

Edit Method on table methods:-

We have 2 methods which we used to access another table data in our form in which we don't have that table as data source.Those are display and edit methods.

Edit method example:

 Suppose take  2 tables  cartable and rental table

 cartable fields-->1)carid as edt and primary index
                           2)Milege as edt

Rental Table Fields-->1)Carid 
                                 2)Custid

steps:

make a relation between cartable and rental table (normal relation in rental table with carid)
create a find method in cartable as

public static cartable find(carid _carid )
{
 cartable car;
 ;
 select car where car.carid==_carid;
 return car;
}

now create an edit method in rental table to edit milege of carid in cartable ,the method looks like

edit milege editmilege(boolean set,milege value)
{
  cartable cartable;
  milege ret;
  ;
cartable=cartable::find(this.carid);

if(set)
{
cartable.selectForUpdate(true);
 ttsbegin;
 cartable.milege=value;
 cartable.update();
 ttscommit;
 return value;
}
else
{
 ret=cartable.milege;
}
return ret;

}

now to test this create a form with rental table as data source and create a grid in design .Drag this edit method into grid it creates a column mileage .

open form and change the milege value it reflects in cartable .this is possible in case of edit method .if we use display method we cannot have a chance to change value .


Friday, 17 August 2012

SysEmailBatch ?

SysEmailBatch mailer;
 
mailer = SysEMailBatch::construct();
mailer.parmPriority(emailPriority::Normal);
mailer.parmSenderAddr("Sender@mail.com");
mailer.parmSendername("Your name");
mailer.parmEmailAddr("receiver@mail.com");
mailer.parmEmailName("Receiver name");
mailer.parmSubject(subject);
mailer.parmMessageBody(msgBody);
 
mailer.run();

Thursday, 16 August 2012

Mandatory DialogField

When adding controls to a standard form, either bound to a data field or not, one useful property is the Mandatory property. If this is set, then the control is shown with a red squiggly line if no value has been entered, and an error will automatically be shown when the user tries to save the record or close the form. This article describes how to also make this functionality available from dialog forms. You need to define the mandatory property in a DialogField class, as shown below.
1. Add mandatory() method into DialogField class:
// Created by GRR on 01.11.2005
void mandatory(boolean r)
{
    str name;
    // If properties exists then we are on server
    if (properties)
    {
        name = #Propertymandatory;
        if (! properties.exists(name))
            properties.add(name,true);
        properties.value(name,r);
    }
    else
        this.fieldControl().mandatory(r);
}
2. Add into unpack() method following lines:
case #PropertyMandatory:
    this.mandatory(unpackedProperties.valueIndex(i));
    break;


Determining if an object is a subclass

It can sometimes be useful to determine if an object is a instance of a subclass of some specified parent class.
While over-use of this probably suggests a class framework which has not been well designed, it is valuable in specific instances.
There are two static methods on the SysDictClass which can be used for this purpose:
static boolean isSuperclass(classId  _id, classId  _potentialAncestorId)
This method checks if the classId passed in _id is a subclass of the _potentialAncestorId
static boolean isEqualOrSuperclass(classId  _id, classId  _potentialAncestorId)
This method checks if the classId passed in _id is a subclass of the _potentialAncestorId, and will also return true if _id equals _potentialAncestorId
The following code uses the SalesTableType heirarchy as an example.
SalesTableType          stt;
SalesTableType_Journal  stt_j;
;
 
// This is true as stt is an ''instance'' of SalesTableType
if (SysDictClass::isEqualOrSuperclass(classidget(stt), classnum(SalesTableType)))
{
    // Code here will be run
}
 
// This is true as stt_j is a ''subclass'' of SalesTableType
if (SysDictClass::isEqualOrSuperclass(classidget(stt_j), classnum(SalesTableType)))
{
    // Code here will be run
}
 
// This is true as stt_j is an ''instance'' of SalesTableType_Journal
if (SysDictClass::isEqualOrSuperclass(classidget(stt_j), classnum(SalesTableType_Journal)))
{
    // Code here will be run
}
 
// This is FALSE as stt is NOT an instance or subclass of SalesTableType_Journal
if (SysDictClass::isEqualOrSuperclass(classidget(stt), classnum(SalesTableType_Journal)))
{
    // Code here will NOT be run
}

Monday, 13 August 2012

Display Method explanation.

Introduction

A display method is not a physical field in a table but rather a method of displaying information from another table or source. It appears like a "normal" field and it can be used in forms and reports. For more information about display methods go to MSDN.

[edit] Usage

A display method can be created on either a table (in which case it is available for all forms using that table), or on the datasource of a specific form (in which case it is available only on that form).
Display methods must be created using a specific signature, which varies depending on the location of the method.

[edit] Display methods on tables

When declared on a table, display methods must be preceded with the keyword display and expect no parameters. The following example is a standard display method from the SalesTable table.
display CustName customerName()
{
    return this.partyTable_CustAccount().Name;
}

[edit] Display methods on datasources

When declared on a form datasource, display methods must have one non-optional parameter. The following example is from the PurchEditLines form in standard Ax 2012. The parameter is a buffer of the same type as that of the datasource on which the method is declared. It is essential as, when viewing a grid on a form, the method must know for which row the return value is to be calculated.
//BP Deviation documented
display ImageRes backOrder(PurchParmLine _purchParmLine)
{
    if (-InventTrans::backOrderQtyIssue(_purchParmLine.ItemId, _purchParmLine.InventDimId) > 0)
        return #Imageinfo;
 
    return 0;
}


[edit] Retrieving data from linked form datasources

When using a display method on a form datasource, it's possible to retrieve values from table fields in other datasources which are linked through an inner join to the current datasource. This is doing using the joinChild method and is illustrated in the example below.
This is the only reliable way to retrieve data from a joined datasource in a display method.
display public SalesQty remain(CustPackingSlipTrans _custPackingSlipTrans)
{
    if (isVersionArchived)
    {
        return _custPackingSlipTrans.joinChild().Remain;
    }
    else
    {
        return _custPackingSlipTrans.Remain;
    }
}


[edit] Limitations

A display method behaves like an ordinary field but has some limitations:
  • its data can not be changed (use edit method instead)
  • you can not filter and sort by display methods
If you need to sort and filter by a display method's data, there are the following workarounds
  1. Replace a display method with an ordinary stored field
  2. Replace a display method with inner joined table
The last is applicable if you have an often situation when display method simply returns a field value of the related table by mandatory field.
For example, you have a display method on the table named YourTable like the following:
//BP Deviation Documented
display EmplName emplName()
{
    return EmplTable::find(this.EmplID).Name;
}
If YourTable.emplID is mandatory, you can use an inner join instead of this display method:
  1. Place additional datasource on your form for EmplTable.
  2. Set LinkType property to 'InnerJoin'
  3. Add 'Name' field of the created EmplTable datasource to your Grid control or wherever else
If your original datasource is read only, your job is done. In the other case, when you try to add a new record to the datasource, you will see an error about mandatory fields of EmplTable. This error occurs because Ax tries to save joined datasource. To prevent such behaviour, you should
4. Override the write method of the EmplTable datasource with an empty implementation to prevent writing data to the table
public void write()
{
    // 'super' is commented out:
    // super();
}
5. Override the validateWrite method of this datasource to prevent error messages:
public boolean validateWrite()
{
    boolean ret;
    ;
    //ret = super();
    ret = true;
    return ret;
}
Now you can filter and sort your datasource by employee full name.

[edit] Caching

One significant side-effect of using display methods can be the impact on performance. Particularly when complex methods are used to calculate values being shown on grids, a visible slow-down in form performance can be experienced. This is largely due to the fact that the methods are often run repeatedly even when no reason is apparent and the values are unchanged.
To alleviate this, display methods on tables can be cached by using the cacheAddMethod method of the datasource object. To enable caching of a display method, call cacheAddMethod() from the init method of the datasource. This ensures that the display will only be calculated when necessary and can result in a significant performance improvement.
public void init()
{
    super();
 
    // Enable caching of the document handling display fields
    dirPartyTable_ds.cacheAddMethod(tablemethodstr(DirPartyTable, showDocHanIcon));
}


For more Information go with this link:http://www.axaptapedia.com/Display_method 

Thursday, 9 August 2012

Showing the value of one field value on basis of another field on the dialog

The following code is for : When u select CustomerId in Field1 then it automatically takes the name of the selected CustomerId in field2...

public class ReportRun extends ObjectRun
{
     DialogField            dialogfield1,dialogfield2;
     CustAccount          custId;
     Name                   name;
}


 public Object dialog(Object _dialog)
  {
    DialogRunbase dialog = _dialog;
    ;
    dialog.caption('Customer information ');
    dialog.addGroup('Select CustomerId :');
    dialogfield1 = dialog.addField(typeid(CustAccount),"Cust Id : ");
    dialogfield1.value(custId);
    dialogfield2 = dialog.addField(typeid(Name),"Cust name : ");
    dialog.allowUpdateOnSelectCtrl(true);

    return dialog;
  }


public void dialogSelectCtrl()

{
     ;
     dialogfield2.value(custTable::find(dialogfield1.value()).Name);
}


boolean getFromDialog()
{
    ;
    custId   =   dialogfield1.value();
    name     =   dialogfield2value();
    return true;.
}